What is worth an overland vehicle without on-board running water? That feature cannot be neglected. Ordinary canisters can be a solution, but not in the long run. To enjoy adventures, you need some kind of comfort and assurance that you carry sufficient amount water for drinking, washing hands, and cleaning up dishes. Your water should be easily accessible. In addition, if you can afford to take hot shower, it would be a luxury. The lack of water, or a good water supply, it is like a day and night during travels in the wilderness.
Some time ago, I carried water in 5-gallon container. When water was needed, I had to pull the table, assemble it, and put a tank on it. Later, I had to pack everything back in the car. It always required reorganization of cargo area, because other things mostly occupied the space needed for a container. I must admit that it was annoying task and I always wanted to postpone it for later. Easily accessible running water was what I needed.
Parts used:
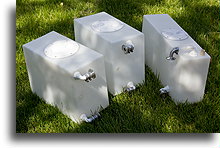
- Three Todd Marine one piece molded water/holding tanks (6 gallons each)
- Six 90° Thru Hull Connectors
- Two 5" Marine White Plastic Deck Inspection Plate
- One 4" Marine White Plastic Deck Inspection Plate
- Stainless Steel Bolts and Nuts
- 18mm Clear Food Grade Silicone Hose
- 19mm 3/4'' Stainless Steel Sanitary Weld Tees
- 19mm 3/4" Stainless Steel Sanitary Weld 90° Elbows
- 19mm 3/4" Stainless Steel Sanitary Weld Ferrules
- Stainless Steel Tri-Clamps
- Sanitary Tri-Clamp Silicon Gaskets
- Two water ball valves
- High Strength Food Grade Clear 100% Silicone Sealant
- Hose clamps
- Two bottle corks
Weight added: empty tanks 25 lb / 11 kg + water 150 lb / 68 kg = 175 lb / 79 kg
Mounting water tank underneath the frame rails was not an option for me. First, it is highly impractical in case you need to clean dirty tank. Second, you would need most likely a pump to fill and use water. Third, you need heat and rock guars, cutting holes in the body would be required. Finally, I had already an auxiliary fuel tank installed under the floor, next to the main tank leaving me no space for another big tank.


In order to comply with my principles of building an overland vehicle, heavy water filled tanks should be installed in such a way that they do not raise the center of gravity of the car. The best place I found for water tanks was on the floor panel platform, behind the driver, in the location of the removed rear seat. It is a spot with flat surface, protected from all the sides. I opted for marine, food grade plastic water tanks. The final solution was to install three 6-gallon tanks in two different sizes. Two tanks connected together for washing and one separate tank for drinking water.


The challenge was to design water pipes connected to tanks and the suitable location for the water valves. I realized that it cannot be a permanent installation. From time to time, I may need to pull out tanks for cleaning. Tanks may become contaminated for example. Each tank has round hatch installed on the top and thru-hull connectors were needed on the side. Cutting out holes was an easy task. In my first design, I used ordinary plastic tubing and connectors. It was a mistake. After two months, hoses developed a smelly fungus. Water stunk. It was a time to redesign this part of the project. I had a proof that food grade hose and connectors are required. I decided to use stainless steel pipes and steel clamps that can allow for a quick and easy tank removal. With new solution, however welding was required.


In my design, I do not use an electric pump. Pouring water and filling up tanks is based on gravitational forces. All the pipes are connected in such a way that allows excess air to escape quickly when filling up tanks. While driving, vents are closed using wine corks. In order to reduce number of hoses and simplify the way tanks are connected I decided that the same valve controlled hose located under the tank can be used for running water or filling up the tank from an external water source.
With quite a lot of water, we can afford to take a hot, temperature-controlled shower. Most importantly, it makes my wife very happy.


